It's all Millsy's fault.
Just when I start to get back into the swing of painting Ogres again, he has to post an article on my greatest weakness; terrain, and the making thereof.
Terrain is, for me at least, the crucial element which allows the temporary suspension of disbelief and a truly immersive gaming experience. The battle of the cornflake box will never be as gripping as the defence of Khartoum. The raid on the St Nazaire U-Boat pens will be an infinitely more memorable game than the raid on the big stack of books at the end of the table. Does this mean I am too literal, that I lack imagination? Very possibly.
Whatever the whys and wherefores, I couldn't resist having a go at some terrain of my own, since Millsy has managed to make it all seem so easy (Warning: it usually isn't. The man is possessed of arcane powers and can turn two bits of string, a beer bottle top, a stick, some PVA glue and a metric cupful of sawdust into a convincing facsimile of Carnarvon Castle).
My 40K army of choice is Orks. I like the look of the figs and the ramshackle, cobbled-together look of their technology. They're fun to paint, and their approach to solving problems comes down to "charge in and crump 'em". It's all so refreshingly simple...
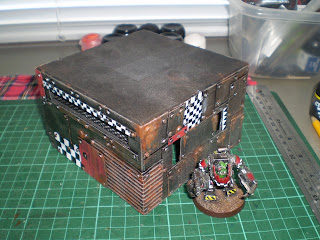
So I thought I'd see what I could knock together as a suitable backdrop for my green thugs. I didn't really go in with a plan, I just started mucking about with bits of plastic card and some scale model girders to see where it all took me. Here's my first piece of species-specific terrain for the Orks;
The rivets were made from plastic rod cut into slices and glued into place. The great thing about orky architecture is that right angles and accurate measurements are largely optional. If you glue a rivet in the wrong spot, just follow it up with another and pretend that's what you wanted the whole time!
A building or two of some sort would be next. Some scrounging around my local hardware store turned up MDF and filler, but no cork tiles. Curses! Big buildings will have to wait or I'll have to find an alternative source of walls. Fortunately, I found a discount shop with a small craft section, so I was able to pick up some papier-mache boxes of various shapes and sizes, and a visit to a bookshop's stationery and art supplies section turned up some foamcore, which is always useful if you need to shape unusual structural elements.
The real find for me was a coloured corrugated cardboard in a newsagent's; so much cheaper than scale corrugated sheet in styrene plastic, and it paints up into a more than passable facsimile of corrugated iron. The plastic card and rod are the biggest expense, but if you're cladding the buildings in bits of cardboard, the plastic is only being used to make detail elements like rivets and the odd plate or girder.
I set to work, and after a few hours of cutting and gluing rivets, plates, plastic strip and cardboard - lots of cardboard - I had a hut ready to paint up. Drybrushing successively lighter metallic tones over the top, picking out panels to paint with suitably orky colour schemes, and rusting the whole thing up with some rough stippling in browns and oranges (old hog bristle brushes are great for this), here's the result.
It's still a work in progress, since these structures positively beg to have more stuff bolted on to them. I'll work on a rooftop parapet for the hut and possibly expand it into a larger piece like a fort or a Mek's workshop. Then there's the basing to think about - stay tuned!


