Wednesday, 11 April 2012

10 things that bug me about wargames vendor websites

Let me preface this by saying I sincerely tried NOT to make this a rant despite the tag :-). The following is meant to be constructive feedback helping foster more sales for vendors, a better shopping experience for players and generally a better outcome for all parties involved in wargaming.

If other bloggers republish this material, add to it and generally discuss it then eventually vendors will take note. Feel free to link here, copy wholesale or do whatever you like, no credit needed or expected. Just talk it up people!

I'm doing some product research right now and the stuff below is driving me firmly in the direction of one vendor, even though their products are 20% dearer than the competition. They may even be of equal or inferior quality BUT I CAN'T TELL because of the failings of other sites, many listed below.

So, that said, these are the top 10 things that annoy me as a customer (or POTENTIAL customer) when researching or buying wargaming products. Here we go then, in no particular order:

1. No product images

If you genuinely want to convince people to buy your stuff you need images of your products. As they say, a picture tells a thousand words. Images of most if not EVERY product and decent quality ones too. If you can manage thumbnails with large zoomable versions so much the better. In an age where many gamers buy from overseas it is a deal breaker as we can't just walk into a store. Even if we can, the majority do our research online.

2. No postage calculator or complicated postage costs

Again, in the age of the internet many of your customers will be online. Gamers spend endless hours costing out what an army will cost them. We save our shekels diligently. To have no idea how much it will cost to have stuff posted, or worse still get a real kick in the proverbials from "postage shock" is a
killer. And while we're at it, please be sensible with your postage rates (INCLUDING countries outside the US and Europe). Don't post at cost, not even on the cheap, just at a sensible rate. Some vendors DO offer 10-25% postage and do well out of it.

3. You must register!

We all know you want to email us telling us about your next greatest endeavour. Many of us want to know too. Really we do! But making us register just to find out how much something would cost is not nice. We'll register when we want to, not when you demand it. Those of us who are really desperate will just fill up your database with junk regos to bypass the step anyway.

4. Odd numbered pack contents

Why sell your products in packs of 5 for regular grunts and 6 for command (which often includes duplicates)? Nothing ever works out evenly when we build units and we end up buying more than we need. It feels like we're being gouged even if we aren't. Arguments like "it is more economical for us this way" simply don't ring true. Nobody believes it costs more to put men with stripes on their shoulders in the plastic bags. If you're selling 28mm+ miniatures then please don't sell them command in massive bags either. We don't need 50 command figs in one go unless we're power mad and then we'll happily buy 10 bags anyway.

5. No army deals

People love a deal, gamers especially. We eat them up. Many of us start a new project with a big order and we're more inclined to stretch a few shekels more if we can have some choice of what goes in the deal, or at least have ANY sort of deal as an option. Fixed deals are OK but often match a rule system
or ratio we're not using. The best deals are buy X number and get one free.

6. Nobody is listening when we ask questions

You've got a contact us link, we got a friendly thank you when we filled in your form and then..... nothing. Silence. Nada. This is what PHONE COMPANIES do to us! Big nasty corporations do it, not real people who play games just like we do. Real people answer our sensible questions and in full, not just with a link and a "You can work it out for yourself here!" A genuine personal touch will go a long way to compensate for price differences, smaller ranges, etc.

7. No news page or lack of info on what is coming next

What's next? What are you doing development-wise? When can we expect to see the next big thing in a range? Tell us! Show us! Just a little peek and we'll keep coming back. We may even buy now knowing your range will be expanding to fulfil our plans.

8. No search option

This might be OK if you only have a few dozen products or great menu structure. However, if you have hundreds of products then please give us something basic to search with. Just a keyword and maybe one or two classifications like scale or period. We'll be fine doing the rest for ourselves.

9. No link back to last catalogue page

We've just navigated out way through 5 levels of menus, browsed to the 10th page of products and found what we want at last. All the products we need there on one screen. The we clicked on "Add to basket" and BOOM, we're back on the home page. Why? Why not back where we were automatically or at least give us a choice? How long will it take us to add a whole bunch of similar stuff to our basket now?

10. Poorly written or overly complicated T&Cs

Last but not least, please don't bury us in complicated, long winded text covering every eventuality including solar flares and melting ice caps. By all means protect your investment and cover against accidents, theft and the like but do it simply and clearly. Keeps your words in plain language and to the point.

So that's it. 10 things I hope don't seem unreasonable and which will make a world of difference to sales and customer satisfaction.

Cheers,
Millsy

Monday, 9 April 2012

TSATF Battle Report - The Relief of Fort Djeli Belli

Today we fought out the TSATF scenario described in a previous blog post - The Relief of Fort Djeli Belli. Here's a report on how things went along with some pictures. Remember to click for larger versions.

View of the table from Fort Djeli Belli showing the road from Port Suakin

Turn One

The British relief column advances up the road from Port Suakin towards Fort Djeli Belli. Hadendowa Tribesmen close in on the fort in the face of sporadic rifle fire from the defenders. A lucky shot from a defender kills a Beja leader.

The British relief column

Fort Djeli Belli and defenders

Hadendowa tribesmen and captured Egyptian artillery

Turn Two

The British relief column fans out to either side of the road with the Royal Irish Fusiliers on the left, King's Royal Rifle Company in the centre and the Naval Brigade on the right. Barkingly-Madd and the Gardner Gun stay safe in the rear of the column.

Khordofan Rebels appear from scrub ahead of the Royal Irish Fusiliers and more from behind a hill ahead of the Naval Brigade. The Khordofan Rebels charge into the Royal Irish Fusiliers who are caught in open order, killing large numbers of them and driving the rest back. The Naval Brigade fare little better, also suffering casulaties and being forced backwards.

Meanwhile the Hadendowa Tribesmen reach the fort and begin trying to scale the walls. A few hardy souls reach the top of the ladders but are thrown off. Native artillery also fires on the fort to little effect.

Fort and threatening tribes

Naval Brigade vs Khordofan Rebels

Royal Irish Fusiliers vs Khordofan Rebels

Turn Three

The Hadendowa Tribesmen continue to assult the fort without success, again suffering casualties as they fall from the ladders.

At the centre of the column the King's Royal Rifle Company are charged by the same Khordofan Rebels that fought the Naval Brigade but they have time to form a rough square before impact. The fight is short and with little in the way of wounded with the Khordofan Rebels eventually being driven off. Free of attackers, the remaining Naval Brigade rally and return to the fray.

Ahead of the King's Royal Royal Rifle Company a unit of Native camels ride out of the brush and head towards the fort before turning and charging towards the King's Royal Rifle Company. On the British left flank the Royal Irish Fusiliers continue to retreat in complete disorder. The crew of the Gardner Gun provide covering fire, giving them time to finally rally.

The fort comes under determined attack

Turn Four

Bloodied but not beaten the Royal Irish Fusiliers advance again towards the Khordofan Rebels whilst the Hadendowa Tribesmen retire from the King's Royal Rifle Company and the Naval Brigade also continue to advance on the British right flank.

Fort Djeli Belli is coming under increasing pressure, assualted by three units of Hadendowa Tribesmen and still under the guns of the captured artillery. Unbowed, the defenders continue to throw attackers from their ladders without a single enemy gaining a foothold despite their efforts.

Can they hold out?

Maybe they can!

KRRC form square and have at them

Turn Five

The Hadendowa Tribesmen have now encircled the fort and begun firing on the defenders at the earthworks in the gatehouse. If only they had a gate! No casualties as yet but they are so few. Charged again by Khordofan Rebels the Royal Irish Fusiliers are beaten in melee once again, lose all their officers and rout. The Khordofan Rebels are almost destroyed too and unable to pursue.

The Naval Brigade continue to advance on the right and are also charged again by the Khordofan Rebels. They too are badly beaten with all officers killed and they rout. Things are looking grim for the relief column!

In the centre the King's Royal Rifle Company form a line and trade rifle fire with the Khalifa's bodyguard who have appeared from the scrub ahead of them. Camels wait off to their left, ready to charge at the right moment.

Enemy at the gates

Hold on lads. Relief is at hand! Maybe...

Buzzard's eye view of the carnage

Charge! Into the teeth of the Gardner Gun

Turn Six

The Hadendowa Tribesmen continue to attack Fort Djeli Belli, now aided by another unit of Khordofan Rebels. This means the single militia unit and Heliograph Section face odds of greater than 4:1. The men defending the gate are all killed and the Hadendowa Tribesmen prepare to rush in.

Unprotected now on both flanks the Gardner Gun is charged by the remaining Khordofan Rebels who drove off the Royal Irish Fusiliers and the Naval Brigade. They kill a few Rebels with a burst of fire before being overwhelmed in melee.

The King's Royal Rifle Company, last surviving intact unit of the relief column are charged by the Hadendowa camels but drive them off with losses. Down to half strength and the only remaining unit of the relief column they cannot reach the fort now surely.

KRRC vs camels. Spitting in the face of the adversity...

The end is nigh for Fort Djeli Belli

Turn Seven

Galled once again by the loss of his force Barkingly-Madd decides to retreat back to Suakin taking the remaining King's Royal Rifle Company with him. As they retire they hear the cries of the Hadendowa Tribesmen and Khordofan Rebels as they pour into Fort Djeli Belli and slaughter the remaining defenders.

Where did the British go wrong?

A grim day for the British and a hard earned victory for the Mahdists.

The British achieved neither of their objectives and the Mahdists both of theirs. The British were too bold advancing the relief column overly quickly and allowing the Khordofan rebels to charge into them before they could fire. A more sedate and maeasure approach would have worked better.

The defenders of Fort Djeli Belli put up an outstanding defence, never once allowing an enemy onto the ramparts. They only fell when the gate was breached and would have survived perhaps another two turns had the relief column not retired and left them to their fate.

House rule on scaling ladders

TSATF provides no rules for scaling ramparts so we made some up. Attackers take one turn to climb a ladder and can fall on a roll of 1-10 on a d20. If they reach the top they fight as if over an obstacle (On Top of Wall or Obstacle) while the defenders fight as defending walls (+1). Two attackers at a time can fight from a ladder.

A fun and free flowing game played with only two players in about 4 hours, testament to the rules once again. Thanks Russ for playing the Natives. Barkingly-Madd will get you yet!

Cheers,
Millsy

The Relief of Fort Djeli Belli - TSATF Scenario

A scenario for The Sword and the Flame (TSATF) set in Eastern Sudan during the Mahdist Wars.
Unit sizes are smaller than the standard in the TSATF rules. Infantry units are 12 men including command. Cavalry or camelry are 6 including command. However any number of figures per unit is appropriate so long as consistent across the forces involved. The ratio of forces is roughly 2.25 Empire vs. Natives as recommended.

Background

In the hills above the Port of Suakin, somewhere along the road to Berber lies the outpost of Fort Djeli Belli. Any who have been there will tell you of how it is the most inhospitable place in all of Eastern Sudan. With little water and surrounded by enemies on all sides, the fort is a place where brave men go to die and lesser men go to be forgotten.

For months the fort has been unoccupied apart from the wind and the buzzards. Two weeks ago Lt. Arthur Branston-Pickle was despatched from Port Suakin with a hastily raised militia unit and a Heliograph section, tasked with garrisoning the fort and providing intelligence on the surrounding Mahdist forces. He was to report back on enemy activity or at least signal headquarters from the highest point he could reach. Nothing has been heard since.

Now, with Branston-Pickle and his tiny force unheard of for far longer that was necessary to complete the mission things have reached a crisis. At the time he was dispatched nobody was aware of his family connections, albeit distant.  Recently a reporter at home in London has been poking around and discovered that Branston-Pickle is a second nephew (twice removed) of the gardener at Kitchener’s country estate. He simply cannot be allowed to die alone and unaided. Men such as these keep the Widow at Windsor safe and her Empire intact.

Fortunately, recently returned miraculously alive from the same hills is Captain Hercules Barkingly-Madd, Royal Navy. Despite the fact “HBM” is something of a bounder and a cad, he has been given command of all available forces and sent to find Branston-Pickle before it is too late…

Objectives / Victory Conditions

Empire Forces

  1. Relieve Lt. Arthur Branston-Pickle and the garrison before they are wiped out.
  2. Clear the surrounding area of Mahdist forces.

Mahdist Forces

  1. Eliminate the garrison of Fort Djeli Belli.
  2. Eliminate the relief column or prevent it reaching the fort in time to relieve the garrison.

Empire Forces

Fort Djeli Belli Garrison

  • Lt. Arthur Branston-Pickle
  • Port of Suakin Militia (12 x pressed men including command)
  • Heliograph section (1 x heliograph and 4 men)

Suakin Relief Column

  • Captain Hercules Barkingly-Madd, Royal Navy
  • Naval Brigade Gardener Gun (1 x gun and 4 crew)
  • Naval Landing Party (10 x ratings plus Lt. and Sgt.)
  • 3rd Battalion 60th Regiment, King's Royal Rifle Corps (10 x infantry plus Lt. and Sgt.)
  • 2nd Battalion 89th Regiment, Royal Irish Fusiliers (10 x infantry plus Lt. and Sgt.)

Mahdist Forces

Surrounding Fort Djeli Belli

  • Osman (leader)
  • Captured Egyptian Krupp field gun (1 x gun and 3 crew plus overseer)
  • Beja tribe (12 x tribesmen including command, armed with swords and spears)
  • Beja tribe (12 x tribesmen including command, armed with swords and spears)
  • Beja tribe (12 x tribesmen including command, armed with captured rifles)

Hidden somewhere along the trail from Port Suakin

  • Khalifa (leader)
  • Mulazamin (8 x personal bodyguard armed with captured rifles)
  • Camelry (6 x camel riders including command, armed with swords and spears)
  • Khordofan rebels (12 x tribesmen including command, armed with swords and spears)
  • Khordofan rebels (12 x tribesmen including command, armed with swords and spears)
  • Khordofan rebels (12 x tribesmen including command, armed with swords and spears)

Reinforcements

Arriving on turns 6+ as required to balance things out if the Empire is winning too easily.
Starting with 1 x d6, roll and a unit arrives on a 5 or 6. Add 1d6 each turn until all units are on the table i.e. turn 2 = 2d6.
  • Osman (leader)
  • Beja tribe (12 x tribesmen including command, armed with swords and spears)
  • Beja tribe (12 x tribesmen including command, armed with swords and spears)


Played out on the table top...

Stay tuned for a battle report and plenty of pics as we try this out on the table top. Plenty of new units which have never seen the field for the British. That can only mean one thing when applying Sodd's Law to anything shiny and new in a wargame...

Sunday, 8 April 2012

Sudan Colonial forces in 28mm

And now for some Empire and Mahdist troops to add to the growing collection...

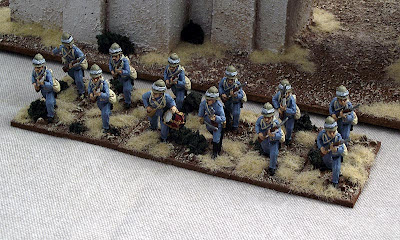
Fighting over the fort in the last post will be an array or forces from the armies of the British Empire and the Mahdists. Here are some quit shots of my most recently completed troops, all from Perry Miniatures. As always, bigger versions when you click the image.

King's Royal Rifle Corps (in green having just arrived in Africa)


Royal Irish Fusiliers


Mahdist commanders, Nile Arabs and a captured artillery piece


In the background is some quick terrain made from an old brush and rocks/gravel. I'm referring to this stuff as "Mahdi Grass". I'll get my coat....

Cheers,
Millsy

Cork Tile Colonial Fort Complete!

It's been quite a while since my last post, partly due to work and partly due to being rather preoccupied with finishing a whole pile of terrain and miniatures for a (large!) colonial skirmish game this Easter Monday.

The central piece is a fort I made from cork tiles. You can read more about it here in the unfinished format. I've still got to make the gates but those will be a doddle.

Here she is in all her completed glory. Remember to click for larger versions...


Cheers,
Millsy
Related Posts Plugin for WordPress, Blogger...